Installing Metal Decorative Bollard Covers using Concrete Inserts
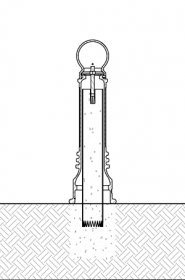
Protect your pipe bollard while enhancing their aesthetic appearance. Metal decorative bollard covers add a sleek, contemporary design element to pre-installed pipe bollards. With this installation method, concrete anchors are used to install the bollard cover into existing concrete inside the pipe bollard.
It is important to note that Reliance Foundry’s bollard covers are primarily decorative. Adding bollard covers to existing pipe bollards will not affect impact resistance. The level of impact resistance is directly related to the original installation.
PARTS LIST
|
# |
PART |
QTY |
|---|---|---|
|
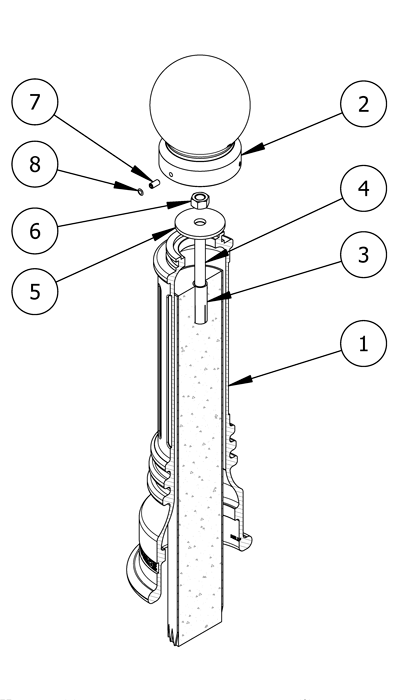
1 |
Decorative Bollard Cover |
1 |
|
2 |
Decorative Bollard Cap |
1 |
|
3 |
3/4″ Drop-In Concrete Insert |
1 |
|
4 |
3/4″ Threaded Rod |
1 |
|
5 |
3/4″ Washer |
1 |
|
6 |
3/4″ Hex Nut |
1 |
|
7 |
Hexagon Socket Set Screw |
3 |
|
8 |
Plastic Plug |
3 |
INSTALLATION EQUIPMENT
|
3/16″ Hex Key |
1-1/8″ Wrench |
|
1″ Masonry Drill Bit |
3/4″ Setting Tool (or equivalent) |
|
Vacuum |
Chalk |
|
Hammer |
Hammer Drill or Rotary Hammer |
|
Level |
|
NOTE
- To protect the finish, keep bollards in original packaging until the exact moment of installation.
- Handle with care to avoid scratching or damaging bollard surfaces as abrasions will lead to rust.
- Once scratched, bollards cannot be repaired to original form without re-finishing the entire surface.
Before installation
Inspect the pipe bollard
Examine the pre-installed pipe bollard for signs of damage. Any rust should be removed, and abrasions should be covered as soon as possible. If the damage is beyond repair, a new pipe bollard may need to be installed.
Hold a level vertically against the side of the pipe bollard and ensure that it is plumb.
Note: Any damage or tilting of the pipe bollard can affect the performance of the bollard cover.

Clean and dry the pipe bollard
Brush or wipe the surface of the pipe bollard. Debris can offset measurements and the placement of the bollard cover.
Mark the placement of the bollard cover
Use chalk to mark the center point on the concrete inside the pipe bollard.
Drill the hole
Create pilot hole
Tap a pilot hole in the center of the hole marking.
This will prevent the rotary hammer from drifting while boring the hole.
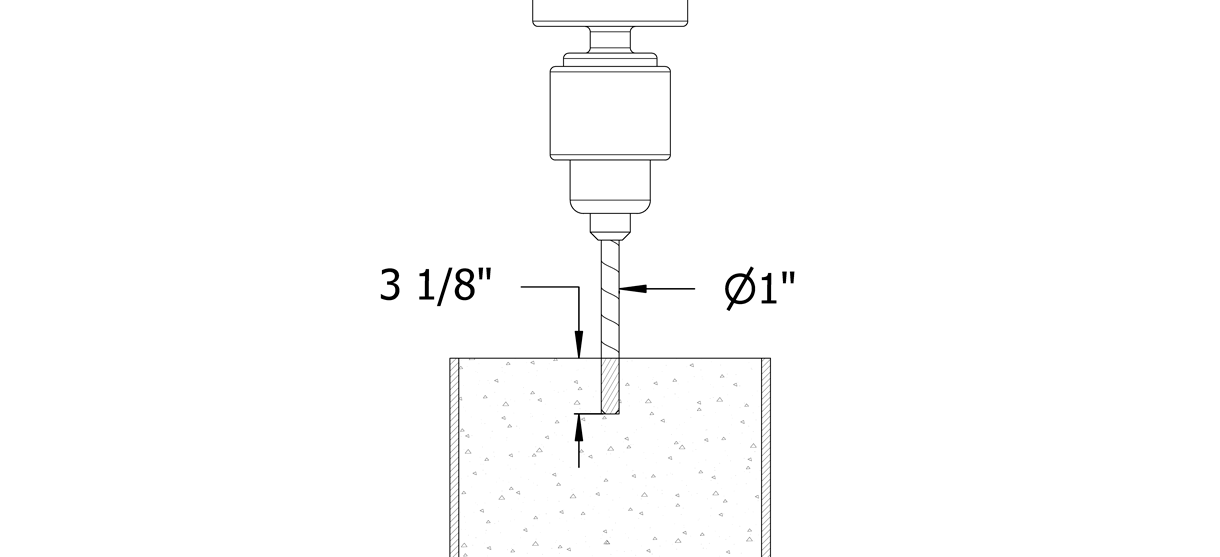
Set the depth control on the hammer drill (or rotary hammer) to 3-1/8″
If depth control is not available, mark 3-1/8″ on the masonry bit.
Drill the hole
Drill a hole that has a 1″ diameter and 3-1/8″ depth.
Ensure the drill is level. Drill on high speed, using the hammer function if available.
Check the masonry bit often to ensure it remains free of debris.
Clear the hole
Clear the hole of all debris using a vacuum.
Set the concrete insert
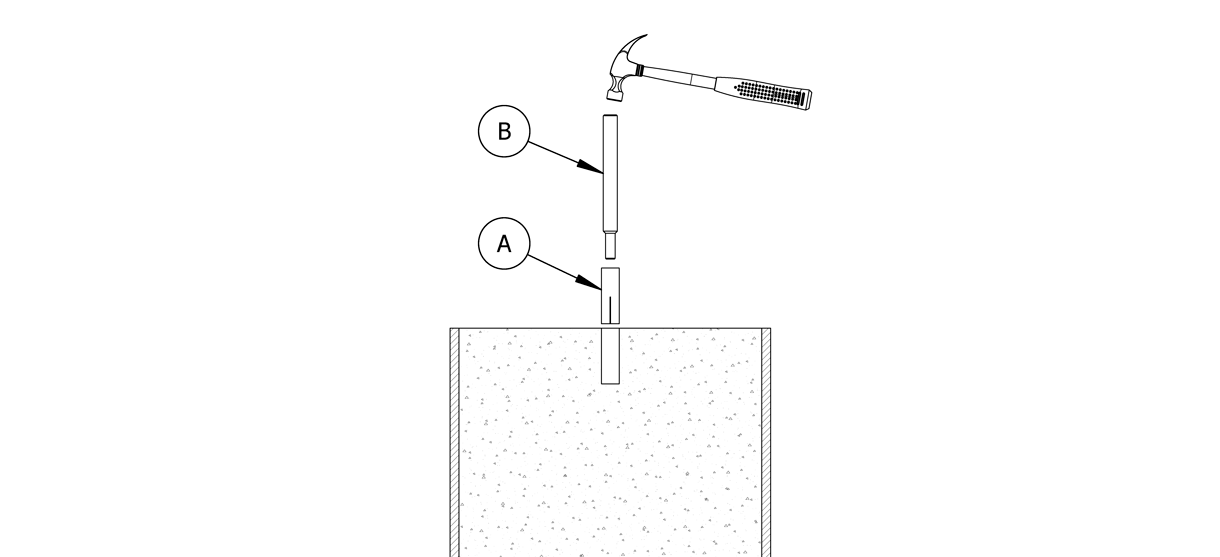
Tap the drop-in insert into the hole
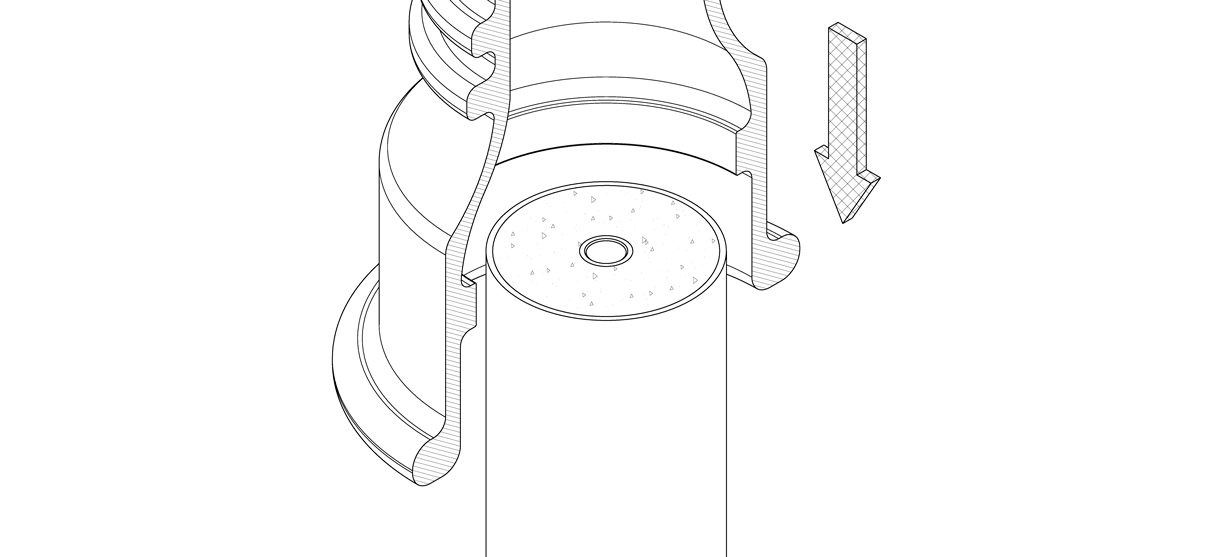
With the slotted end facing down, drive the drop-in insert (A) down until its top sits flush with the concrete surface.
Ensure that the top is perfectly level.
Set the concrete insert
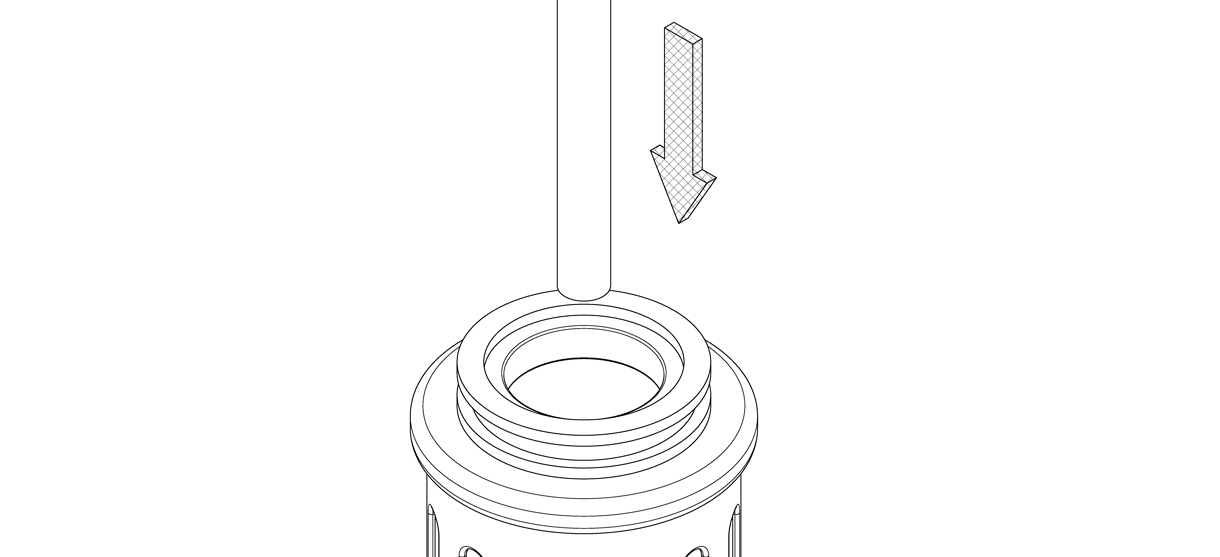
Insert a setting tool (B) into the threaded hole, then hammer down.
If a proper setting tool is not available, an equivalent flat-end punch can be used.
This will cause the internal expansion plug to set the concrete insert in place.
Install the bollard cover
There are two options for installing the bollard cover and inserting the threaded rod. Option 1: Insert the threaded rod after bollard cover placement, or Option 2: Insert the threaded rod prior to bollard cover placement.
Option 1 (insert threaded rod after bollard cover placement)
Clean the surface of the pipe bollard
Use a cloth to clean off any residue, dust, or debris.
Prepare the bollard cover for installation
Keep the bollard cover in its protective packaging and place near the installation site.
When ready to install, remove its protective packaging.
Set the bollard cover
Lift the bollard cover and carefully lower over the pipe bollard.
Note: Metal bollard covers can be heavy—to prevent accidents and injuries, ensure the proper resources are available to lift bollard covers into place or onto their mountings.
Insert the threaded rod and tighten
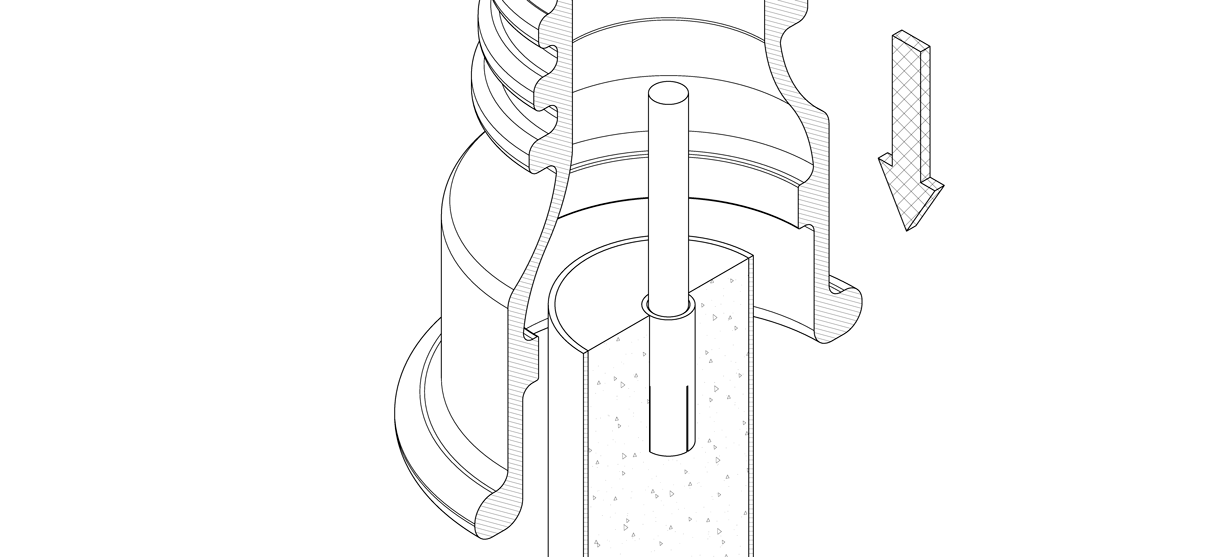
Lower the threaded rod through the top of the bollard cover and into the concrete insert.
Tighten(1) the threaded rod by hand until it is secure in the concrete insert.
Measure the total distance from the surface grade to the top of the threaded rod. Ensure that this total distance does not exceed the maximum bar height in the product drawing.
Note: The maximum bar height differs based on the bollard cover model. Refer to product drawings to determine specific measurements.
Option 2 (insert threaded rod prior to bollard cover placement)
Insert the threaded rod and tighten
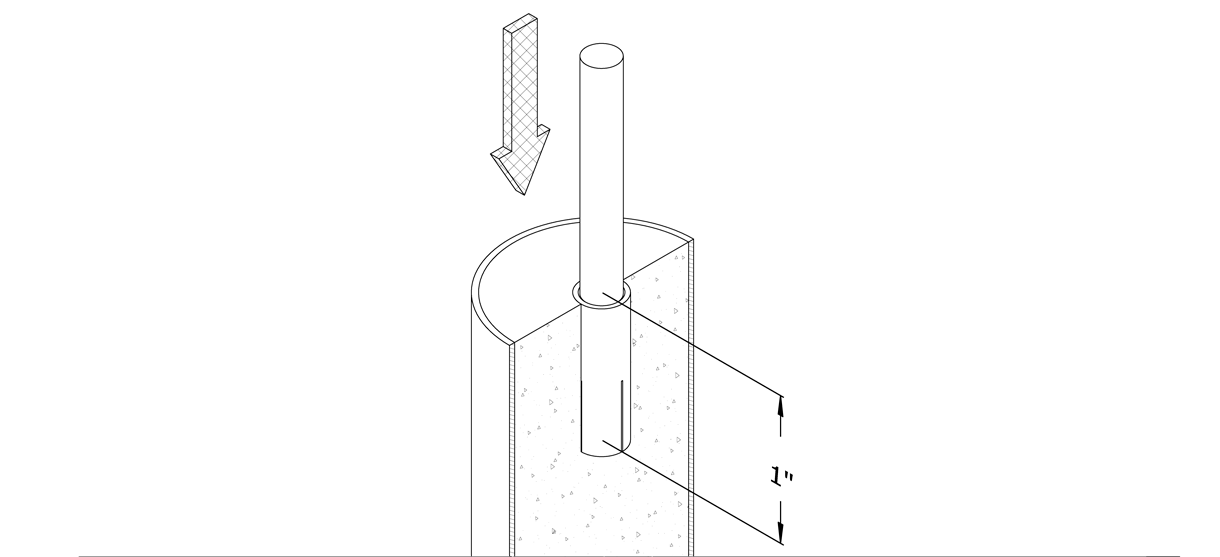
Insert the threaded rod into the concrete insert.
Tighten* the threaded rod by hand until it is secure in the concrete insert.
Measure the total distance from the surface grade to the top of the threaded rod. Ensure that this total distance does not exceed the maximum bar height in the product drawing.
Note: The maximum bar height differs based on the bollard cover model. Refer to product drawings to determine specific measurements.
Clean the surface of the pipe bollard
Use a cloth to clean off any residue, dust, or debris.
Prepare the bollard cover for installation
Keep the bollard cover in its protective packaging and place near the installation site.
When ready to install, remove its protective packaging.
Set the bollard cover
Lift the bollard cover and carefully lower over the threaded rod and pipe bollard.
Note: Metal bollard covers can be heavy—to prevent accidents and injuries, ensure the proper resources are available to lift bollard covers into place or onto their mountings.
Secure the bollard cover
Secure the bollard cover
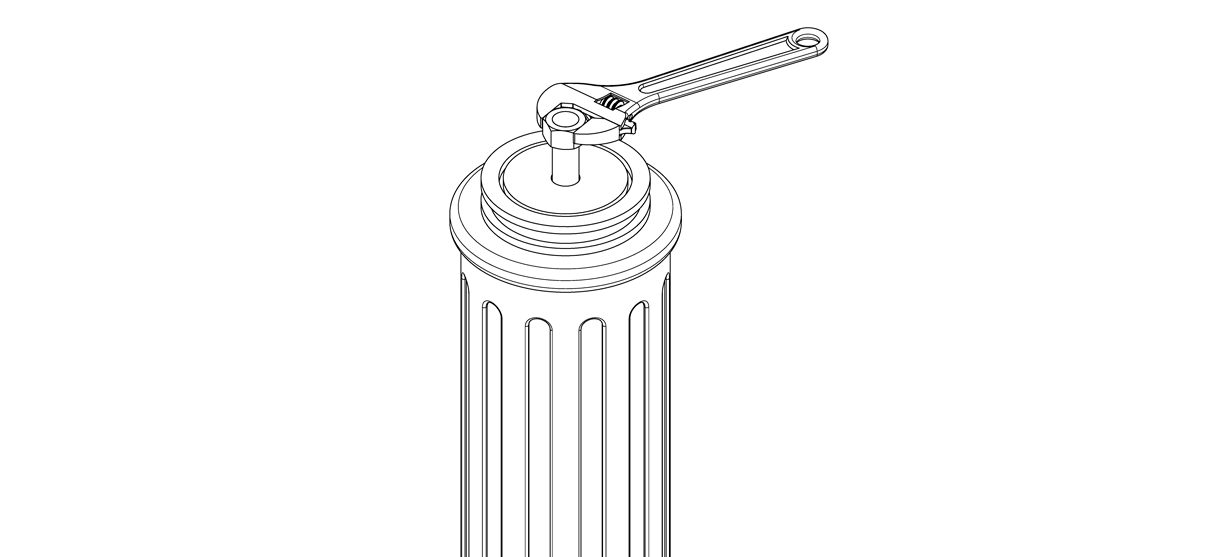
Place the washer over the threaded rod so that it rests on top of the shaft of the pipe bollard.
Apply the 3/4″ nut to the threaded rod and use a wrench to tighten until the bollard is secure.
Secure the bollard cover cap
Remove the bollard cover cap from its packaging.
Place the cap on the top of the shaft of the bollard cover.
Secure and align the cap to the base with the three set screws. Tighten in equal amounts to ensure that the cap remains centered.
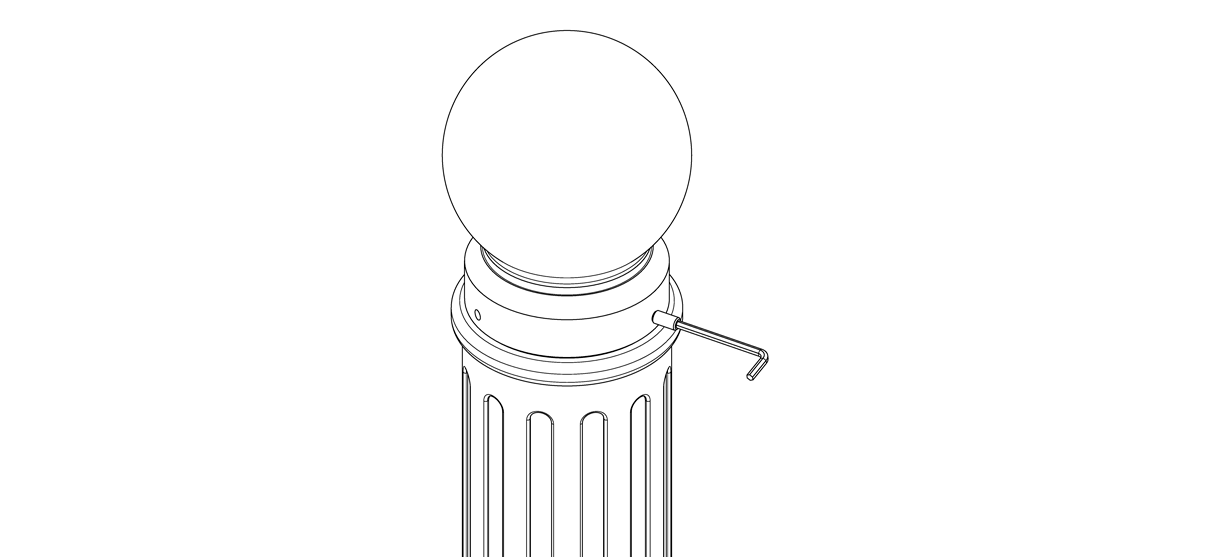
Place the plastic plugs over the set screws.

Inspect
Inspect the installation
From a distance, examine the plane of view.
Ensure the bollard is plumb.
Check the bollard for any signs of surface damage
Abrasions should be covered as soon as possible to prevent rust and ensure the proper life of the bollard. For damage repair or other servicing needs, please contact Reliance Foundry’s sales department.
Care and maintenance
Reliance Foundry manufactures its products to the highest design standards to ensure their durability. Reliance Foundry’s bollards are finished with long-lasting powder coating. In most North American environments, routine inspections and cleaning will ensure that bollards retain their aesthetic appeal. Proper care and maintenance are required to maintain the finish and ensure a full service life.
1. The manufacturer recommends tightening the threaded rod to a depth of approximately 1″ into the concrete insert