Installing the R-7512 T-Head Mooring Bollard Cast-in Anchor
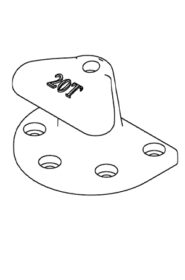
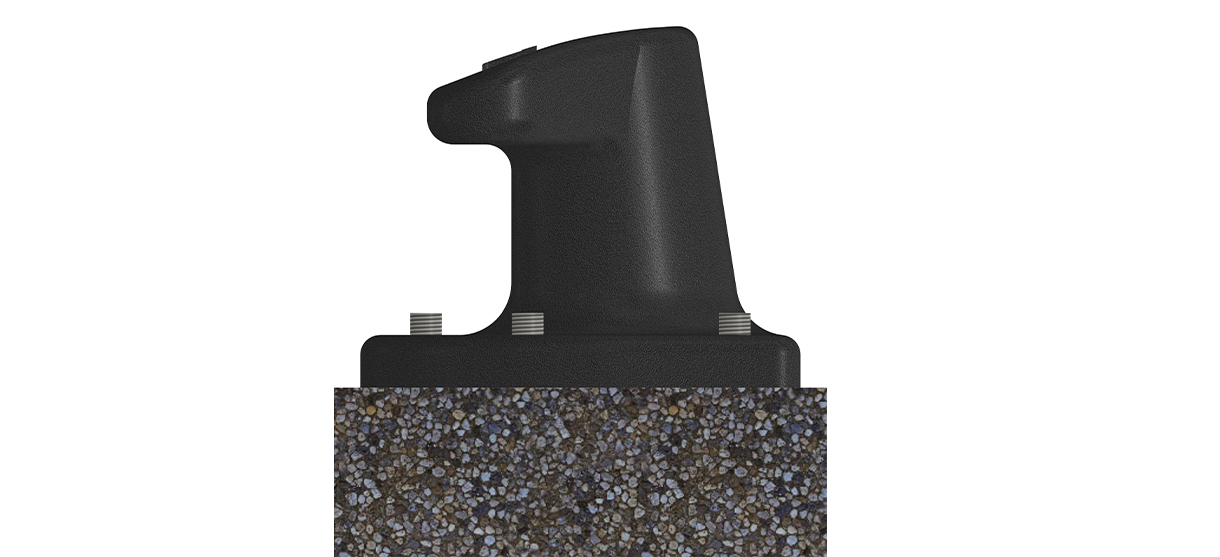
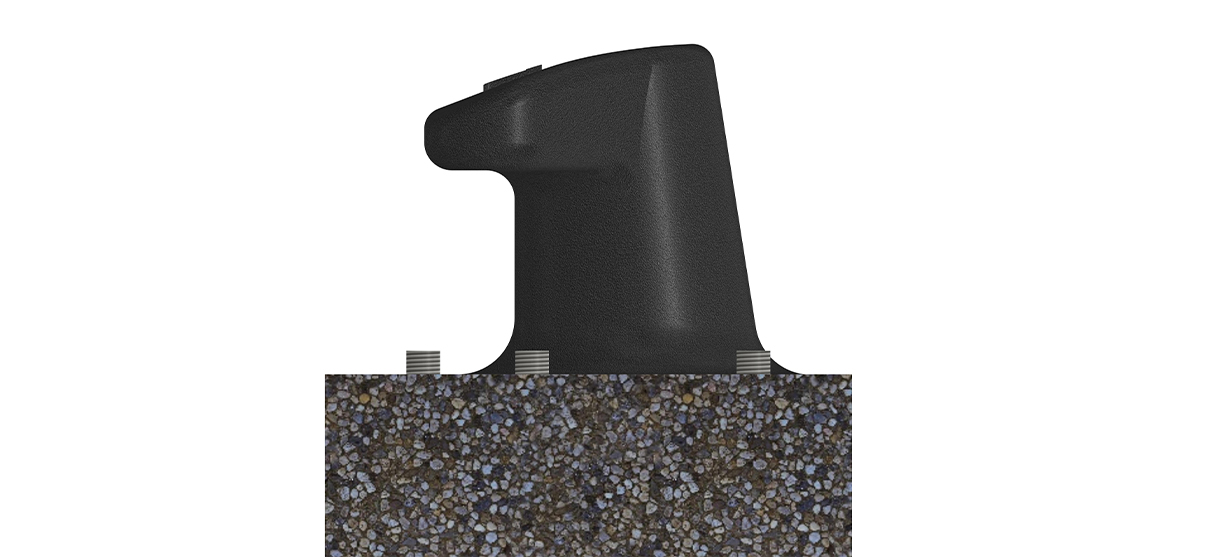
The R-7512 T-Head Mooring Bollard is a specially-designed marine bollard for carrying wire ropes. The bollard has a “T” shaped top, a simple and efficient shape for securing marine vessels to a wharf, and is suitable for steeper rope angles.
The T-Head Mooring Bollard has two mounting options: it can be surface mounted, or recess mounted. Recess mounting is generally recognized as superior, as recessing the base prevents the bolts from working loose. In either case, the bollard is fixed with anchors—either cast-in or using epoxy and resin.
For a cast-in anchor installation, steel reinforcements must be provided and should be reviewed by a site engineer or technician with appropriate knowledge of the site’s requirements.
Surface Mount
Materials and Equipment Needed
|
T-head Mooring Bollard |
Provided by Reliance Foundry |
|
Steel Reinforcement Bar |
As determined by site engineer |
|
Anchors |
Provided by Reliance Foundry |
|
Anchor Bolt Template |
Provided by Reliance Foundry |
|
Washers and Nuts |
Provided by Reliance Foundry |
|
Wrench |
For M24 Hex Nut |
|
Excavation Equivalent |
As per site requirements |
|
Cover Boundary |
Required if installing recess mounted |
|
Grout |
Non-shrink grout with a minimum strength of 60 MPa |
|
Shims |
|
|
Boundary Forms |
For grouting |
|
General PPE |
As per site requirements |
Recess Mount
NOTE
- Reliance Foundry Co. Ltd. is not responsible for installation and cannot offer guidance on specialized applications. Please refer to the product warranty for specifics.
Before installation
General guidelines
Anchor Installation should be carried out by qualified personnel and under the supervision of the person responsible for technical matters of the site.
Use anchors supplied by Reliance Foundry.
Have a site engineer confirm that the strength class of the concrete used is appropriate for this bollard.
Study the site plans
Study the site plans and mark the intended location of each bollard on the plan.
Check for hazards
Always check for hazards such as water pipes, gas lines, and underground wiring before digging
Note: You may need a permit to dig to certain depths or in certain locations.
Preparation for cast-in anchor installation
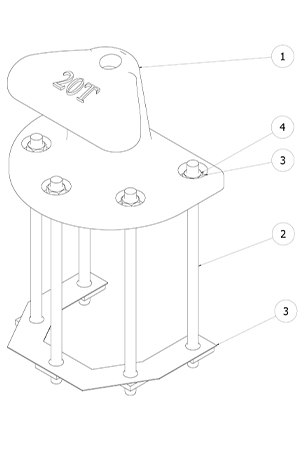
Anchors must be installed and in position before concrete is poured. Steel reinforcements must be provided to the anchors.
Mark the embedment length on all anchors at 60 mm [2.36"].

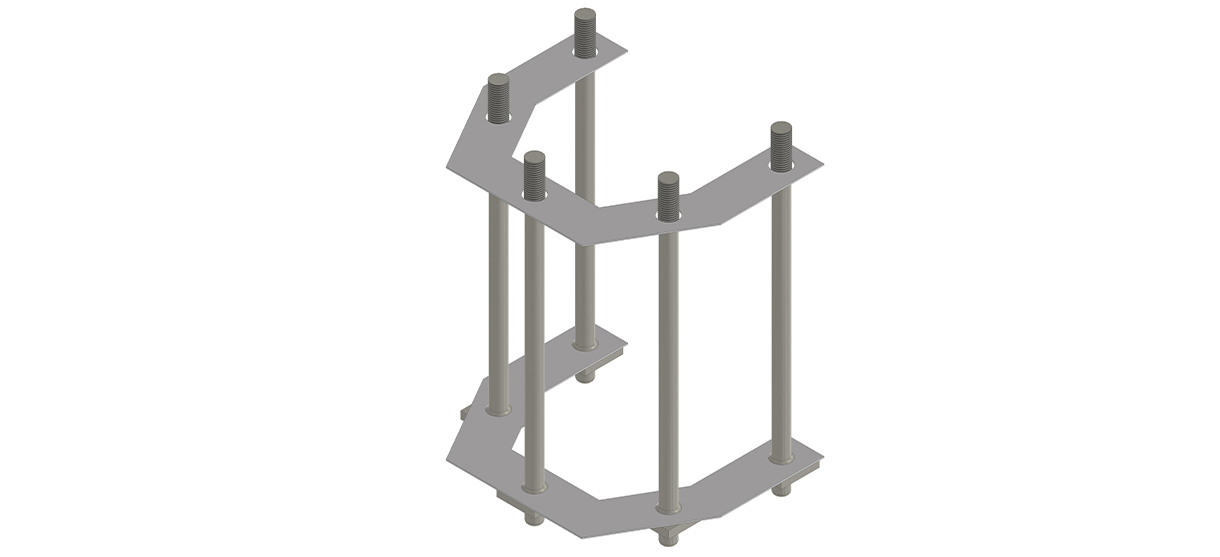
Align the anchors using the two provided anchor templates. Place one template on the head of the anchor and fix the other anchor at the embedment length.
Restrain the top template to avoid any movement.
Reinforce the anchors with steel bars. The reinforcement design can be carried out by a jetty designer or site engineer.
For a surface mounted installation, dig to a minimum depth of 440 mm [17.32"]
For a recessed mount installation, dig to a minimum depth of 500 mm [19.69"]
Place anchors inside hole such that bollard will have a 20 mm [0.8"] gap on every side
Pour the concrete
Pour the concrete as per instruction of the site supervisor.
In the case of a recessed mount, the recess must be 60 mm [2.36"] deep after this pour. Use a cover boundary to prevent the concrete being poured into the required recess.
Confirm the protrusion height of each anchor.
Provide enough time to allow the concrete to cure fully. Do not touch the anchors until the required curing time has passed.
Grout and place the bollard
Roughen the surface of the concrete and remove all debris from the surface.
Clean the base of the bollard of all grease, dirt, loose rust and scale.
Align the bollard on the anchors and shim to leave a gap between the base and the concrete surface.
- Use either removable shims, or corrosion-free shims if non-removable.
Check the alignment of the bollard using a level.
Use boundary forms to isolate the area for grouting.
Follow grout manufacturer’s procedure for filling the grout.
Grout should be sturdy and caulked approximately 15 mm [0.6"] around the edge of the base of the bollard.
Place the grout at least 5 mm [0.2"] above the bottom of the base flange.
Cover immediately with wet rags or curing compound.
Allow grout time to cure completely.
Torquing to anchors
Once grout has cured, place provided washers and nuts and torque to 240 N-m.
Inspect
Inspect the installation
From a distance, examine the plane of view.
Ensure the bollard is plumb.
Check the bollard for any signs of surface damage
Abrasions should be covered as soon as possible to prevent rust and ensure the proper life of the bollard. For damage repair or other servicing needs, please contact Reliance Foundry’s sales department.
Care and maintenance
Reliance Foundry manufactures its products to the highest design standards to ensure their durability. Reliance Foundry’s bollards are finished with long-lasting powder coating. In most North American environments, routine inspections and cleaning will ensure that bollards retain their aesthetic appeal. Proper care and maintenance are required to maintain the finish and ensure a full service life.